Archive for June, 2013


G07 mistakes

The Electrohome G07 is a simple monitor…  At least that’s what I keep hearing and seeing.

As simple as it is however, I have not had a lot of experience with the G07.  The majority of my experience has been with 1990’s computer monitors and more recently 1990’s arcade monitors such as Wells Gardner and similar.  Compared to the later monitors, the G07 is completely foreign.  For instance, the horizontal output transistor is mounted off of the board on a heatsink.  It’s insulated from the heatsink to keep it from grounding out because the outer case of the transistor is one of the conductors BUT, this conductor does need to go to something so Electrohome uses a bracket with a wire on it that the mounting screws go in to.

G07 HOT
The problem I had ran into was that NTE had included additional insulators in their replacement transistor kit.  I had incorrectly assumed that more insulating is better.  The problem being that it broke electrical contact from the heatsink AND the back bracket which resulted in an open circuit, no high voltage and a dead monitor.

This is a cautionary tale.  The last 3 monitors I have not been able to fix and needed additional help on were due to improperly mounted HOT’s.  Some day I’ll learn this lesson.

Another note about the G07, the hot may appear to test as shorted because of an internal diode.  Always make sure to test from the pins to the case.  Testing between the pins looks like a short.

vapor

For months now Vapor Trx has been driving me crazy.  Every time I looked at it I wanted to sort out the issue.  The problem is that sometimes all of the colors were there and it would work great.  Then usually red would flake out and sometimes green.

I had pulled this board out and reworked it over a good bit.  It had a lot of lifted traces from heat issues and other solder issues along with needing a few caps.  I had done all of this, shoved it back in and it worked great for about a day.   I finally got the chance to dig into it a bit more.

I started by re-reworking the neck board since this is the most likely place for a failure with a color channel to occur.  I popped it back in and it was once again fine for a bit and then it died.  I popped it out and felt that there are 3 color driver transistors that looked very suspicious.  Those were the main spots where the traces had lifted due to heat and they all have crappy clip-on heatsinks that were kind of loose.  I decide to see if the part was bad or if I was having connection issues on the PCB.  I decided to swap the red drive transistor with the green one.

When I tossed it back in the machine, it worked perfectly until I came back the next day.  Luckily it was once again missing a color, but this time green.  So now I could be certain that the transistor itself was failing under load.  I stopped by Vecto, grabbed 3 NTE198’s and popped them in.  I tightened up all the heatsinks and fired it off.

I don’t want to jinx it but I’m now pretty certain that this one is fixed.  Hopefully people start playing it now that the screen actually looks good…

si-727r-ds

Well it’s my fault.  I should have known better and checked this but I had tossed in the incorrect horizontal output transistor.  I had purchased a box of 5 replacements off of eBay for a Wells Gardener 25K7401.  That monitor however had a silicon insulator pad that kept the back of the HOT insulated from the heatsink.  The SI-727 however, does not.  When I stupidly installed that part in the unit, it was shorting out and giving me tick-tick-tick noises because the switching power supply was trying to fire up but went into protective shutdown.

Once I fired the monitor up, the picture looked terrible.  Looking into the cabinet though you could tell an amateur did the harness hack.  He twisted wires together and poorly electrical taped them.  This was not the problem but I fixed it.  Ultimately the problem was that the signal ground came detached in the process of fixing the monitor.  For the life of me, I could not find the proper place to attach this wire but ultimately I found one suitable at least.

The monitor still isn’t quite right.  The picture grows and shrinks slightly when going from light to dark scenes(monitor bloom) and the image does not quite fit the screen.  As annoying as this is though, the game is at least playable now.Lessons learned?

Always make sure none of the legs of the HOT have continuity with the heatsink unless of course it’s designed to do so and if you picture every looks inexplicably bad, check your grounds.

Asteroids Free Play part 2


asteroids2

If you recall from part 1 of this adventure, I have been working on the Asteroids game over at The Airlock.  Back in the heyday of arcade games, there was only ONE main purpose of an arcade game.  That purpose is to collect money.  As long as it can sit there with two coin slots and accept quarters, some arcade owners didn’t care if it looked or played good.

Of course we all know that people are much more likely to play a game if it LOOKS like it works.  Oddly though, Asteroids actually has a lockout where if the game is not turned on, your quarters/tokens will simply fall right into the coin return.  WHY the designers of Asteroids thought it to be necessary to protect people from their stupidity of inserting quarters into a game with no signs of life is far beyond me.

Other things will prevent people from playing a game as well or at least paying for it.  In the case of this asteroids, it was dealing credits every time the trust button was pressed.  Well today I discovered something else…  Every time you insert a coin into the right hand coin slot, it would hit the rocket thrusts.  BINGO!  This made it perfectly clear to us that those lines were crossed.

I started by checking the wiring harness to see if those two lines were crossed but they were not.  Moving on from that, I checked the board.  Found it!  There was a small solder bridge on the shift register that handled the coin and thrust signals.  Apparently when I was sprucing up the board to get it working again, I got a little overzealous in places and in this particular spot, I bridged it.

Now we still have an odd problem with it.  The jumpers are set for “1 coin, 1 play” and it says that on the screen but for some reason, one coin actually will buy you two plays.  Why?  Not sure.  Maybe we’ll sort that out in part 3…

Sharp Image SI-727R-DS

IMG_0737

At The Airlock, there is a dead game in the corner called Hyperdrive.  In fact, it’s not just one but two dead games.  It appears that one side of it was dropped on it’s face.  The previous owner probably left it sitting somewhere without the seat portion attached.  If someone bumped it, it wouldn’t take much to knock it over.

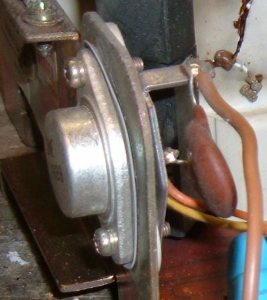
When it got knocked over, I believe the monitor was broken.  This theory comes from the fact that the monitors in each side are different.  Not only that, we have an extra monitor chassis board for the side that was not knocked over.  The monitor this game uses is the Sharp Image SI-727R-DS.  The 7 must be the series, 27 is the size, R is RCA tube and DS is dual scan if I’m not mistaken.

At first, the SI-727 seems like a beautiful chassis design.  It seems like it’s everything that any arcade operator could want in an arcade monitor.  It has fairly detailed silk screening on both sides of the PCB, switchable 15K/25K frequency, a nicely made remote board and it’s very easy to remove the chassis from the frame for servicing.

Further investigation reveals some problems however.   I have a SI-727R-DS board sitting here that I have nicknamed clicky.  We tend to nickname monitors with difficult or repeating problems at the airlock.  For instance, we have squishy, which is the radar screen in pod 4…. As you can guess, that one is vertically squished just slightly.  We recapped it, touched up the solder and it was still squished.  I think the problem may be a shorted diode in the vertical drive circuit but we haven’t had time to pull it back out to check.  We also have had other such as blinky, buzzy, etc.

The SI-727 is clicky though.  If I recall correctly, it makes a clicking noise when you fire it up.  This is most likely the power supply continually trying to power up and then power down when it realizes that the horizontal output transistor is shorted.  The question it, what has shorted the transistor?

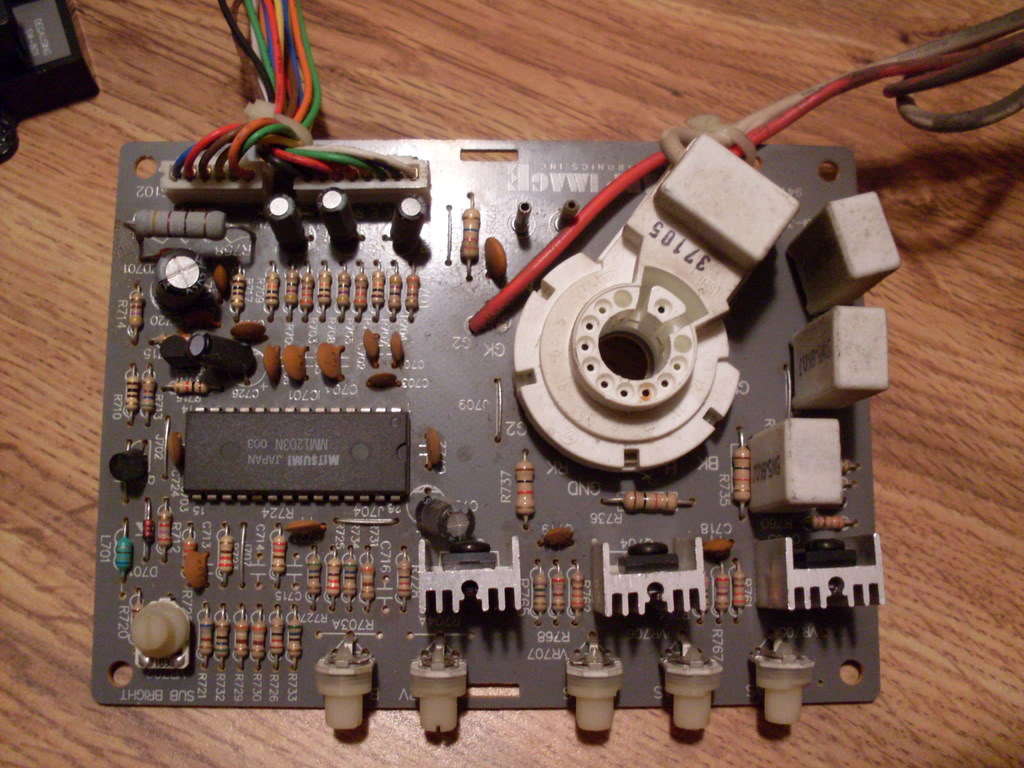
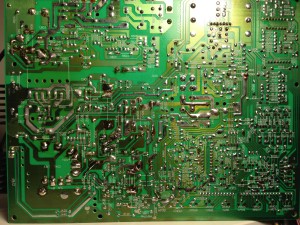
I’m really not sure yet.  This brings me to some of the problems I have experienced with the SI-727.  First off, it has some nasty trace rot.  The traces are far too happy to badly separate themselves from the PCB.  Usually this problem is indicative of using too high of a heat setting on your soldering iron but I recently upgraded my iron to an extremely bad ass Hakko FX-951.  The heat control on this iron is better than anything I’ve ever used or seen.  All that said, I think these PCB’s just weren’t made well in the first place.  In this picture, you can see the trace side of the board.  If you click on it, look very closely and you’ll see where I needed to lay some solder wick by the horizontal output transistor and use it to beef up the trace.  I’ve had to use this trick from time to time but usually it’s because a previous technician has screwed up the board.  in this case, just the act of removing the HOT tore up two of the pads.

IMG_0736

The other problem I have with this monitor is that I cannot find a service manual and/or schematic for it.  When a problem like this arises, it can be invaluable to refer to a schematic for troubleshooting.  Sharp Image, the company that made this monitor appears to be long since out of business but I used a sneaky trick to find their old site, The Wayback Machine!  Looking through this old site however proved to be a fruitless effort.  In ALL of the archived pages I checked, old and new, the SI-727 schematic was nowhere to be found.   Some forum post mentioned checking the SI-527 manual, which I did, but that was also a fruitless effort.  All of the components seem to have different reference numbers so that’s not going to be especially helpful.

I’m confident that we will get this issue sorted out but it might be tedious without the schematic…

Powered by WordPress. Theme: Motion by 85ideas.