Tag Archive: Libretto


My Libretto doesn’t have a CD-ROM drive in it.  Sure there is an external drive that I can plug in and run but why would I want to haul around a drive that is almost as large as the whole computer just to play some old game that requires a CD-ROM drive to function?  Many of the old CD-ROM games are around 10mb anyways so it makes no sense to use a CD-ROM drive for them.  Even on a desktop, do you really want to monopolize your CD-ROM drive with a disk just to play one game?  I figured that someone out there must have a solution so I found one.  The problem was that I couldn’t find any documentation, just odd hints scattered across the web.

The program you need is SHSUCDHD and SHSUCDX.  These are part of a package called SHSUCD that is available here.  The whole package is pitched as a replacement for mscdex but the feature I’m interested in is just the emulation.  What’s nice about it is that it doesn’t require any TSR’s in your config.sys file.  You can either start it on demand or in the autoexec.bat file.  My goal was to run Wizardry 7: Crusaders of the Dark Savant.  So I put a chain of commands into a batch file that I run when I want to start that game.  The lines related to SHSUCD are as follows:

shcdhd86 /f:wiz.iso

shsucdx /d:shsu-cdh

This assumes that SHCDHD86 is in the same directory as wiz.iso.  SHCDHD86 is the same as SHSUCDHD if I’m not mistaken so hopefully that isn’t too confusing.  The first lines points the virtual cd-rom driver at the iso you wish to mount.  The second line specifies what drive letter bind the image to.  After all of this is done, you should be able to go to the D:\ drive and there will be the contents of your ISO.

In my spiffy batch file, I put commands to unload the cd-rom drivers after the game is done using them:

shsucdx /u

shcdhd86 /u

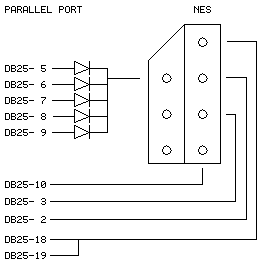
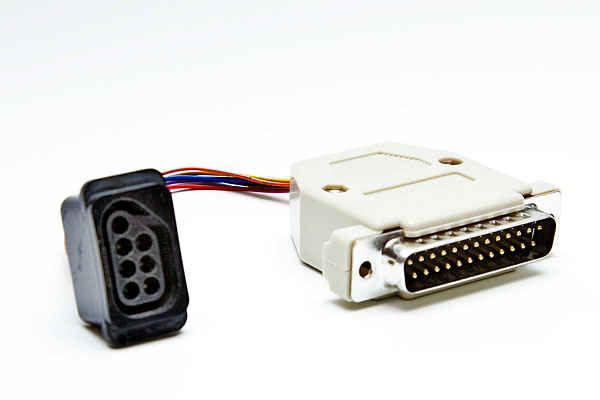
At some point, some clever folks figured out that a NES controller contains a simple 8-bit shift register that can be read by a parallel port.  There are really just 3 things that matter.  Those are CLOCK, LATCH & DATA.  The rest of the pins and the diodes are just for power and ground.

With my version, I actually used one additional pin for power which was pin 4.  According to some sites, 1n914 diodes are ideal but in my case, I used 1n4001 diodes which were readily available at Radio Shack in a grab bag and they seem to work just fine.  I think that almost any silicon diodes will do the trick in this application.  The only reason for them is so the power is not back fed through the port as a side effect of tying all the lines together.  Overall, this is a GREAT beginner hack if you are just learning about electronics since it doesn’t even require a circuit board.

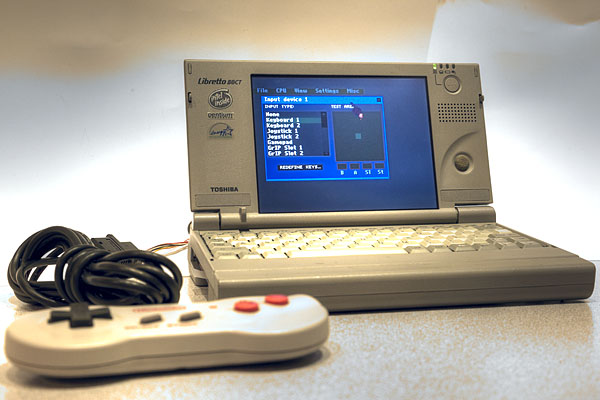
After the hardware was done, the software is the next piece of the puzzle.  I am using sneskey as my driver.  Sneskey is a slick little program that allows you to map many different types of controllers to keys on your keyboard.  You don’t really run sneskey in the background as a TSR though.  Instead, you set up the sneskey configuration file to load your emulator.  In my case, I used nesticle.  To set this whole thing up, download I would just extract all the sneskey files into the same directory as you extract nesticle and it’s companion program dos/4gw.  After that, you’ll want to edit the nes.ini file and change the ProgPath line to look something like this:

ProgPath = c:\nesticle\nesticle

Check the key bindings while you are in there.  They should be fine though.  After that, you should be able to launch nesticle and sneskey with the following command:

C:\nesticle>sneskey nes

Once you have launched the program with your controller plugged in, go to settings –>  input  –>  device 1.  In there, make sure Keyboard 1 is selected.  If all went well, everything should work except A & B.  Hit “redefine keys” and click on “A”, then press “A” on the gamepad to bind the key.  Repeat the process for “B” and you should now be good to go.

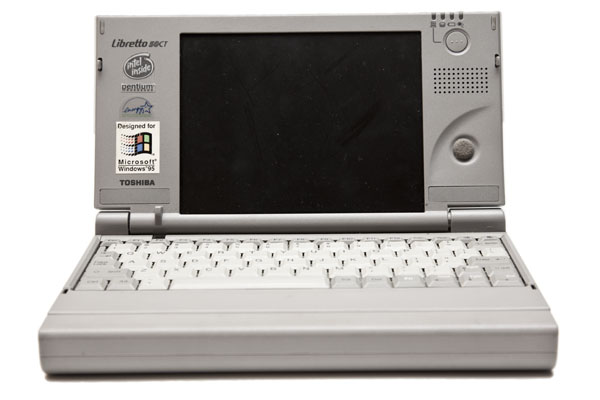
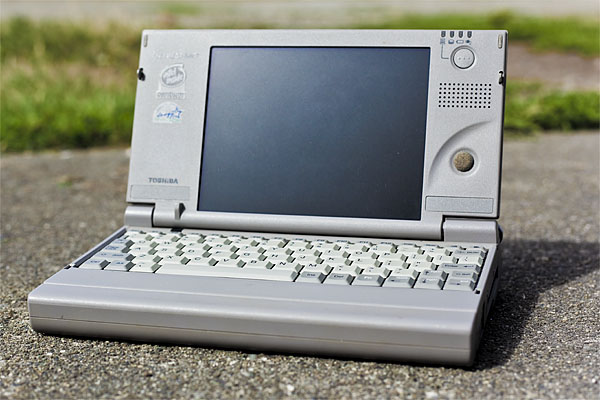
Ever since the first time I saw a Toshiba Libretto I have wanted one.  For years I’ve been watching them on eBay but never wanted to pay the ridiculous prices that they fetched but finally I won my very own Libretto 50CT for $16.  Sure it’s insanely old technology now given that it’s a Pentium 75MHz(sorta) with 16mb of ram and a 815mb hard drive but it’s still a neat little computer and should be great for playing some old dos games and a few other uses I’ve yet to think of.  If you are not familiar with this computer, it is roughly the size of a VHS cassette tape.  Very small in other words.  This Toshiba Libretto 50ct was released in the USA around 1997.

One thing about this little machine that actually disappointed me a bit was that when I booted it up, I found the hard drive to be unbearably loud.  I mean I have 3 other laptops in the room and this one managed to overpower them all(sonically) by a significant margin.  No worries though because I came up with a solution.

While I admit that the Syba 2.5 inch IDE Dual Compact Flash Adapter costs almost as much as the laptop itself did, I have to also say that it was well worth it.  It was not a perfect fit however…  There are two problems with putting the Syba into the Toshiba Libretto.  First off, it’s too thick.  The Libretto hard drive is WELL under the normal spec at a super slim 7.5mm while the Syba is actually bloated for the spec it was trying to achieve.  The Syba is a fat 9.9mm instead of a more standard 9.5mm.  This was easily rectified by deshrouding the thing though.  Pulling off the unnecessary plastic slims the Syba adapter down to 8.7mm which is snug but ultimately does comfortably fit inside of the Libretto.

Click to expand

Next problem is also easy but the solution may not be for the faint of heart.  The Toshiba Libretto is expecting a keyed connector on the hard drive.  The Syba adapter, however, has all 44-pins as would be expected according to the spec.  The solution is to carefully line up the original hard drive and the Syba adapter paying CAREFUL attention to which direction is up.  Then simply take a pair of diagonal cutters and cut the interfering pin off your new adapter.  Doing this will also ensure that you will not need to fear screwing up the alignment when inserting the adapter into the Libretto.

One bummer about this setup is that the second CF slot is non-operational in the Libretto.  Apparently the controller does not have a second channel or it is used somewhere else.  One more bit of advice is the put the adapter in with no CF card in it so you can see to the bottom of the drive bay and line it up properly.  After that, stick your CF card in.  You can make a little tape tail for your CF card if you want your cards to be easy to swap out when you open up the drive bay.  I have not delved into performance benchmarking yet but so far it seems snappy enough for my purposes so I am pleased with the setup.  One final caveat I will leave you with is that this setup will not accept a micro drive since that is too thick.

Powered by WordPress. Theme: Motion by 85ideas.