Tag Archive: Gentoo


This picture intentionally left blank 😉

This is a continuation of my instructions on installing Gentoo on the Libretto 110ct.  After I got xorg-server running properly, I noticed that screen blanking and LCD powerdown did not work correctly.  They produced very strange effects and did not ultimately blank the screen or power down the backlight.  This is an old computer but I intend to leave it running constantly so I want to make sure to preserve the life of the backlight as long as possible.

First off, make sure the Toshiba experimental ACPI driver is compiled into the kernel.  It’s included by default in the 3.0 and many of the earlier kernel versions.  Then you’ll want to grab toshset.  Toshset is the key to this whole process.  You can test the driver by typing:

cat /proc/toshiba

You can test it further after installing toshset by typing:

toshset -q

If all that stuff works, you are ready to move forward.

I searched the Internet high and low and could not find what I needed.  What I wanted was something extremely light weight that would use the hooks already built into xorg-server to invoke toshset.  I still feel like this must be possible even though we went a different direction.

In my search I came across exactly one person on the Internet who sounded like she ran across the same problem as me.  On her page she said:

“So what if you really do want your backlight to turn off after a specific interval? There doesn’t seem to be a way to get Xorg to do it directly. But you can cheat: Write a script that calls vbetool dpms off. Then set that script to be your screensaver. “

Sounded close, so after more searching I finally gave up and emailed Akkana and asked her how she did it.  Turns out she didn’t remember but after a couple of email exchanges, we came up with an idea together of how to do this pretty easily.  I had the idea to use a python script to poll the mouse and keyboard nodes out of ‘/dev/inputs’.  I was really pleased when Akkana emailed me back the next day and said something like “Ya, good idea, here it is!”

She sent a script that monitored the everything in ‘/dev/inputs’ and then invokes a system command(whatever you specify) when the idle time counts up to a certain point.  I modified the script a bit so that it would also run another program when activity in those nodes is detected.

When the screen is not blanked, the polling interval is 5 seconds to keep things REALLY light weight.  I tweaked it to up the polling interval when the screen is blanked to 5 times per second so there is no perceivable lag when waking up the screen.

Did I mention this script is REALLY light weight?  It doesn’t even show up in top when it’s on the 5 second polling interval.  (I haven’t ssh’d in yet to check the .2 second interval yet).  So after all that buildup, here’s the script:

#! /usr/bin/env python

# idlerunner -- run a screensaver-type program when input devices are idle.
# By Akkana Peck, akkana  shallowsky (dot) com
# based on an idea from Geordy Rostad, geordy  hotmail (dot) com
# Copyright 2011, please re-use, share and improve under the terms
# of the GPLv2 or later.

import sys, os, select
import time

# how long to wait before firing the screensaver:
TIME_THRESH = 60 * 5   # seconds * minutes

# Global polling interval
interval = 5

# Read from every /dev/input device:
INPUTDIR = "/dev/input"
inputdevs = []
for devname in os.listdir(INPUTDIR) :
   try :
       inputdevs.append(open(os.path.join(INPUTDIR, devname)))
   except :
       pass
#      print "Not watching", devname
# uncomment for troubleshooting ^^^

last_event_time = time.time()

while True :
   time.sleep(interval)
   inp, outp, err = select.select(inputdevs, [], [], .5)

   if not inp or len(inp) == 0 :
       # we're idle! But for how long?
       idletime = time.time() - last_event_time
       if idletime > TIME_THRESH :
#          print "Firing screensaver!"
# uncomment for troubleshooting ^^^
# command to blank the screen
	   SCREENSAVER = "toshset -bl off"
# Set polling to a really quick interval when screen is blanked so it wakes quickly
           interval = .2
           os.system(SCREENSAVER)
           # Let this wait until the screensaver process finishes,
           # so we won't keep checking and fire up another copy.
       else:
           pass
#          print "Idle but only for", idletime, "secs"
# uncomment for troubleshooting ^^^
       continue

   # There's apparently no way to flush input without reading it:
   SCREENSAVER = "toshset -bl on > /dev/null"
# Switch back to longer polling interval when screen saver is off
   interval = 5
   os.system(SCREENSAVER)
#  print "There's something there in", len(inp), "devices"
# uncomment for troubleshooting ^^^
   last_event_time = time.time()
   for f in inp :
       os.read(f.fileno(), 4096)

I’d stick idlerunner.py in ‘/usr/local/source’ (along with toshset).  Make sure to set it executable.  You’ll want to add a file to your ‘/etc/local.d’ directory to start idlerunner in the background.

echo “/usr/local/idlerunner.py &” > /etc/local.d/idlerunner.start && chmod 755 /etc/local.d/idlerunner.start

Next, in your xorg.conf file, you’ll need to add some lines to your xorg.conf file.  These lines will prevent the odd behavior from the built in stuff from occurring.

In the Monitor section add: 

        Option          "DPMS"

In the ServerLayout section, add:

        Option          "BlankTime"     "0"
        Option          "StandbyTime"   "0"
        Option          "SuspendTime"   "0"
        Option          "OffTime"       "0"

This all turned out even better than I had hoped because it’s independent of X entirely and blanks the local consoles as well.  Props to Akkana for generously spending her time to help a complete stranger with a problem on a 15 year old computer.

I finally broke down and bought a Libretto 110CT.  This machine was pretty incredible for it’s day.  It’s a Pentium 233MHz with MMX and has 64mb of ram.  It had a 4.3gb hard drive in it.  That needed to go so I snagged another CF to IDE adapter off Amazon and put a 16gb Kingston CF card in it.

I didn’t bother trying to install Gentoo on the local machine.  That would be ridiculously slow and probably impossible because of the PCMCIA cdrom drivers.  I opted to use my much faster Celeron 466MHz.  I decided to dedicate that machine to building system disks for my 3 Librettos. I decided it would make life easier to grab a CF Adapter on a Bracket and stick that into the Celeron.

I’m glad I did this since this build-out required a LOT of experimentation.  I built up the system mostly as normal but the first deviation from the path was in the partitioning.  I made explicitly sure to make the first partition the /boot partition.  That had to stay under 1gb I believe but I kept it at 100mb since I figured that was all I needed.

Next, I used lilo.  In lilo, I did a couple of tricky things.  One of which was to use “linear” mode.  All these years I wondered what exactly that meant but now I know.  It’s a mode used for bioses that don’t support aalternate geometries such as LBA mode.  To be honest, I don’t think I really needed that setting on the Libretto 110ct but I’m positive that it’s necessary for a Libretto 50ct to boot a “disk” larger than a gig or so.  Also in lilo.conf, I specified some undocumented kernel features.  Let me print it here and then I’ll explain:

#lba32
# If lba32 do not work, use linear:
linear

# MBR to install LILO to:
boot = /dev/sda
install = /boot/boot-menu.b   # Note that for lilo-22.5.5 or later you
# do not need boot-{text,menu,bmp}.b in
# /boot, as they are linked into the lilo
# binary.

menu-scheme=Wb
prompt
# If you always want to see the prompt with a 15 second timeout:
timeout=150
delay = 50
# Normal VGA console
# vga = normal
# VESA console with size 800x480x24 (this warrants additional experimentation)
#vga = 0x808

image = /boot/bzImage-stable
root = /dev/sda5
label = Gentoo
append=”video=neofb:libretto”
image = /boot/bzImage
root = /dev/sda5
label = Test
append=”video=neofb:libretto”

So there it is, “video=neofb:libretto”.  That is one of the keys to making the framebuffer work on this system.  Someone already did the hard work for me of putting the necessary 110ct setting straight into the linux kernel for me.  I just wish they had documented it somewhere so I didn’t have to go digging through kernel code to find that.

Beyond lilo, the kernel config is also somewhat notable.  I’m running the 3.0.6-gentoo kernel on here which is the newest currently available.  My .config is definitely not optimized to the point it needs to be but it’s certainly a good starting point.  I would only suggest using it with the identical kernel version.  If not, I would only use it as a guide.  Mainly there is the Yenta PCMCIA, Neomagic Framebuffer, Generic PATA and some other tweaks.  Just read the config.

Next bit of secret sauce is in the xorg.conf.  That drove me (and some friends) completely nuts.  Partially because I tried to get too clever and compile dwm without xinerama.  That used to work, now it doesn’t.  Here is the xorg.conf I’m using:

Section “ServerLayout”
Identifier     “X.org Configured”
Screen      0  “Screen0” 0 0
InputDevice    “Mouse0” “CorePointer”
InputDevice    “Keyboard0” “CoreKeyboard”
EndSection

Section “Files”
ModulePath   “/usr/lib/xorg/modules”
FontPath     “/usr/share/fonts/misc/”
FontPath     “/usr/share/fonts/TTF/”
FontPath     “/usr/share/fonts/OTF/”
FontPath     “/usr/share/fonts/Type1/”
FontPath     “/usr/share/fonts/100dpi/”
FontPath     “/usr/share/fonts/75dpi/”
EndSection

Section “Module”
Load  “extmod”
Load  “dbe”
EndSection

Section “InputDevice”
Identifier  “Keyboard0”
Driver      “kbd”
EndSection

Section “InputDevice”
Identifier  “Mouse0”
Driver      “mouse”
Option        “Protocol” “auto”
Option        “Device” “/dev/input/mice”
Option        “ZAxisMapping” “4 5 6 7”
EndSection

Section “Monitor”
Identifier   “Monitor0”
VendorName   “Monitor Vendor”
ModelName    “Monitor Model”
HorizSync    31.5-48.5
VertRefresh  56-72
#    ModeLine     “800×480” 40 800 864 928 1088 480 481 484 509 -hsync -vsync
#       ModeLine     “800×480” 31.5 800 860 940 1000 480 508 511 525 -hsync -vsync
#    ModeLine     “800×480” 36.769 800 848 896 1120 480 508 511 525
#    HorizSync    25-75
#    VertRefresh    50-75
DisplaySize 160 100
EndSection

Section “Device”
### Available Driver options are:-
### Values: <i>: integer, <f>: float, <bool>: “True”/”False”,
### <string>: “String”, <freq>: “<f> Hz/kHz/MHz”,
### <percent>: “<f>%”
### [arg]: arg optional
Option      “ShadowFB”    “off”           # [<bool>]
Option      “PCIBurst”    “off”
#Option     “Rotate”                 # <str>
#Option     “fbdev”                  # <str>
#Option     “debug”                  # [<bool>]
Identifier  “Card0”
Driver        “neomagic”
Option “DisplayHeight480”
#    Driver      “vesa”
BusID       “PCI:0:4:0”
Option “override_validate_mode”
Option “XaaNoScanLineImageWriteRect”
Option “XaaNoScanLineCPUToScreenColorExpandFill”
EndSection

Section “Screen”
Identifier “Screen0”
Device     “Card0”
Monitor    “Monitor0”
DefaultDepth 16
SubSection “Display”
Depth     16
Modes “800×480”
EndSubSection
SubSection “Display”
Viewport   0 0
Depth     24
EndSubSection
EndSection

Fair warning, I’m not sure if this is totally optimal but it seems to do the trick for me.  Here is the make.conf I’m using now which also may not be optimal:

# Please consult /usr/share/portage/config/make.conf.example for a more
# detailed example.
CFLAGS=”-O2 -march=i486 -pipe”
CXXFLAGS=”${CFLAGS}”
# WARNING: Changing your CHOST is not something that should be done lightly.
# Please consult http://www.gentoo.org/doc/en/change-chost.xml before changing.
CHOST=”i486-pc-linux-gnu”

USE=”X mmx png python fbcon jpeg tiff xorg dri -minimal udev hal -evdev -alsa -pppd
-introspection -cairo ssl gtk ncurses -ipv6 -kde -gnome xinerama -test -savedconfig
-selinux -doc -static-libs crypt -pm-utils”
VIDEO_CARDS=”neomagic fbdev vesa”

At this point, I see no reason to leave the fbdev and vesa in the video cards section.  Some of the other flags are a bit random as well but at the moment, they are getting the job done.  Here is my current world file (for the curious):

app-admin/eselect
app-admin/syslog-ng
app-editors/vim
dev-lang/perl
dev-libs/glib
dev-vcs/subversion
net-analyzer/dsniff
net-analyzer/netcat
net-analyzer/nmap
net-analyzer/tcpdump
net-analyzer/traceroute
net-irc/ircii
net-irc/irssi
net-misc/dhcpcd
net-misc/ntp
net-misc/socat
net-wireless/wireless-tools
net-wireless/wpa_supplicant
sys-apps/pciutils
sys-apps/pcmciautils
sys-boot/grub
sys-boot/lilo
sys-devel/distcc
sys-devel/libperl
sys-kernel/gentoo-sources
sys-power/acpi
sys-process/vixie-cron
www-client/dillo
www-client/links
www-client/lynx
x11-base/xorg-server
x11-base/xorg-x11
x11-misc/dmenu
x11-terms/eterm
x11-terms/rxvt
x11-terms/st
x11-terms/xterm
x11-wm/dwm
x11-wm/fluxbox
x11-wm/twm

Some of the tools are for experimentation, others are requirements.  Another notable thing is my default runlevels:

lrwxrwxrwx 1 root root   18 Jan 15  1990 dhcpcd -> /etc/init.d/dhcpcd
lrwxrwxrwx 1 root root   15 Nov  6 14:39 gpm -> /etc/init.d/gpm
lrwxrwxrwx 1 root root   17 Oct  8 08:50 local -> /etc/init.d/local
lrwxrwxrwx 1 root root   16 Nov 13 12:37 ntpd -> /etc/init.d/ntpd
lrwxrwxrwx 1 root root   21 Oct  8 17:11 syslog-ng -> /etc/init.d/syslog-ng
lrwxrwxrwx 1 root root   22 Oct  8 17:11 vixie-cron -> /etc/init.d/vixie-cron
lrwxrwxrwx 1 root root   26 Nov  6 14:21 wpa_supplicant -> /etc/init.d/wpa_supplicant

Notice ntpd, dhcpcd and wpa_supplicant.  I’m using wpa_supplicant to do all wifi configuration.  It seems to work very slick and for any type of network I want now that I figured it out.  Here is a sanitized version of what I put in the /etc/wpa_supplicant/wpa_supplicant.conf file:

#WPA1/2 with passphrase
network={
ssid=”anotherlinksys”
psk=”password”
}

#WPA1/2 with passphrase
network={
ssid=”myrouter”
psk=”password”
}
#WEP with passphrase
network={
ssid=”TheAirlock”
key_mgmt=NONE
wep_key0=”the airlock rules!”
wep_tx_keyidx=0
}
#WEP hex key
network={
ssid=”linksys”
key_mgmt=NONE
wep_key0=0123456789
wep_tx_keyidx=0
}

You can have as many networks as you want in there and it seems to automatically jump to the best one.  Now, I wouldn’t actually need the wireless-tools package at all except for what I’m doing next.  In order to put proper status in the bar on dwm, I did a little .xinitrc scripting:

#!/bin/sh

ntpdate pool.ntp.org &

while true
do
LOCALTIME=$(date +%A” “%D” “%I:%M%p)
RAM=$(free -m | awk ‘/cache:/ { print $4″M Free” }’)
BAT=”Bat. $(acpi -b | awk ‘{print $4 ” ” $5 }’ | tr -d ‘,’)”

xsetroot -name “$BAT | $LOCALTIME | $RAM”

sleep 15s

ROUTER=$(iwconfig wlan0 | awk ‘/ESSID:/ { print $4″ ” }’ | tr -d ‘ESSID:”‘)
SIGNAL=$(iwconfig | awk ‘/Quality=/ { print $2 }’ | tr -d “Quality=”)

xsetroot -name “Access point: $ROUTER | Strength: $SIGNAL”

sleep 10s
done &

#startfluxbox
dwm

This flashes between two status displays.  The first stays on the screen for 15 seconds.  It looks like this:

Bat. 100% | Thursday 11/17/11 12:56AM | 15M Free

The second stays up for 5 seconds and looks like:

Access Point: linksys | Strength: 29/70

None of it is rocket science but I was rather pleased with myself.  It also makes dwm WAY more friendly.  I’m convinced that dwm is the best window manager for the Libretto 110ct because it’s the lightest I know of and makes the absolute best use of the screen real estate.  I would urge you to give it a try.  If you don’t like it, fluxbox is another great choice.

All in all, I’m certain there is more experimentation to be made.  BTW, udev is required to recognize pcmcia cards so don’t get the stupid idea I had to pull it out.  Speaking of which, I’m using a D-Link DWL-G650 wifi card which is atheros 5k-based.  It seems pretty stable overall.  One thing that does not seem 100% is the power management.  I think it has led to a couple of lockups for me.  Mainly when plugging and removing AC power but certainly not always.

Bottom line…  How many other modern, fully patched and up-to-date operating systems do you think would run on an ancient laptop like this?  Not many.  Next task is to get X forwarding and distcc working.  Then I’ll be off to hack the gibson…

Since there is no central repository for fresh U-Boot binaries for the Zipit Z2, I decided to build my own u-boot.bin from source.  Before I could do this, I needed to build a cross compiler for the arm processor.  This is something I’ve always had trouble with on Debian systems but this time I used Gentoo and everything worked flawlessly.  Luckily Marex left me with some very helpful hints on how to get the job done.  First, you’ll need to set up a cross compiler if you have not already:

emerge crossdev

You’ll need to add the following lines to your /etc/make.conf:

PORTDIR_OVERLAY=”/usr/local/portage $PORTDIR_OVERLAY”

Don’t forget to make the following directory since that is where your new tool chain is going to live:

mkdir /usr/local/portage

Now it’s time to build your tool chain.  This will take quite a bit of time.

time crossdev -S -t arm-linux-gnueabi

After all of that, you should be ready to build your u-boot.bin.  First you need to grab the latest snapshot from http://git.denx.de/?p=u-boot/u-boot-pxa.git;a=shortlog;h=refs/heads/devel.  Go ahead and unpack the file in your home directory:

tar -xvf u-boot-pxa-*

cd u-boot-pxa

Next you need to run the following command.  Double check and make certain that you have a space between the “…gnueabi-” and the “zipitz2…” parts.

make CROSS_COMPILE=arm-linux-gnueabi- zipitz2_config

Lastly, you can build the u-boot.bin firmware file with this command:

make CROSS_COMPILE=arm-linux-gnueabi-

You should now have a working u-boot.bin file in the ./u-boot-pxa directory.  With that file, you can follow these instructions to upgrade U-boot on your Zipit Z2.  As usual, thanks to Marex for giving me the proper hints to make this happen.

I’ve been messing around with my stack of WRT54G routers this weekend.  So far I have serial modded two out of the five that I have sitting here.  The neat thing about the serial mod is that it’s so easy to grab a console off of it without worrying about network parameters.  The bad thing is that your router may or may not be connected to the internet when you are on that console.  It’s pretty easy to hook up to another wireless router in client mode from the console.  I couldn’t find the following information all in one place so I’m going to hash out the quick version here:

iwconfig wlan0 essid router_name

iwconfig wlan0 key 0123456789 (I have a wep router handy for connecting older devices)

ifconfig wlan0 10.10.10.40 netmask 255.255.255.0 (no dhcp client on my router by default)

ifconfig wlan0 up

route add default gw 10.10.10.1

ifconfig wlan0 up

and finally add a known dns server (like 8.8.8.8) to your /etc/resolv.conf with vi

For advanced Unix users, none of this is anything new but hopefully this will help someone else out there who is struggling through an OpenWrt or Gentoo install or can’t figure out how to configure wireless on your Zipit after you’ve put an aftermarket root fs on it.  All of these settings will disappear when you reboot your device aside from editing the resolv.conf although if you are using a WRT54G series router, your edits to the resolv.conf will also disappear.

Installing Gentoo in a Fusion VM

The other day I installed Gentoo on an old Celeron 466MHz and it was quite an adventure.  Today, I’m attempting to install it in a far more useful capacity as a virtual machine under VMware Fusion.  The first thing I did was create a new virtual machine.  There is no template for Gentoo so I tweaked the settings a bit.  I gave it 512MB ram, 30GB hard drive and set it to “generic linux 2.6.X kernel”.  I set it to boot from the minimal ISO that I used to burn the CD for the other day. After I was booted up, I ran a couple of benchmarks.  Thankfully this system is several orders of magnitude faster than a Celeron 466MHz.

Using fdisk, I created my 3 partions:

/boot /dev/sda1

swap /dev/sda2

/        /dev/sda3

Then I did my mkfsing:

mke2fs /dev/sda1

mke2fs -j /dev/sda3

mkswap /dev/sda2 && swapon /dev/sda2

Now it was time to snag my stage file.  This time instead of wget, I used links:

links gentoo.org

I hit the downloads link, then hit the stages button next to i686 and found the most recent stage3-i686 tar.bz2 file and downloaded it.  After that, I untarred it:

tar -xpjf s<TAB>

Next, I changed snagged the latest portage via links and untarred that:

cd  usr

links distfiles.gentoo.org/snapshots

tar -xpjf p<TAB>

Then it’s time to chroot:

livecd / # mount -t proc proc /mnt/gentoo/proc

livecd / # mount -o bind /dev /mnt/gentoo/dev

livecd / # cp -L /etc/resolv.conf /mnt/gentoo/etc/

livecd / # chroot /mnt/gentoo /bin/bash

livecd / # env-update && source /etc/profile

Then I set the timezone:

cp /usr/share/zoneinfo/America/Los_Angeles /etc/localtime

After that, it’s time to fix up the hostname:

cd /etc

echo “127.0.0.1 gentoo.notanon.com gentoo localhost” > hosts

sed -i -e ‘s/HOSTNAME.*/HOSTNAME=”gentoo”/’ conf.d/hostname

hostname gentoo

Now for the kernel.  I didn’t do a lot of tweaking with the kernel this time around.  I just added ext2 support and a couple of extra modules I want to experiment with.

emerge gentoo-sources

cd /usr/src/linux

make menuconfig

time make -j2

make modules_install

cp arch/i386/boot/bzImage /boot/kernel

Then I editted the /etc/fstab to look something like this:

/dev/sda1 /boot ext2 noauto,noatime 1 2

/dev/sda3 / ext3 noatime 0 1

/dev/sda2 none swap sw 0 0

Then I installed cron, syslog, grub dhcpcd:

time emerge syslog-ng vixie-cron grub dhcpcd

rc-update add syslog-ng default

rc-update add vixie-cron default

After that it’s time to nano /boot/grub/grub.conf:

default 0

timeout 10

title Gentoo

root (hd0,0)

kernel /boot/kernel root=/dev/sda3

Then I ran grub and entered:

root (hd0,0)

setup (hd0)

quit

After this, supposedly it’s time to unchroot, cross my fingers and reboot:

exit

umount /mnt/gentoo/dev /mnt/gentoo/proc /mnt/gentoo/boot /mnt/gentoo

reboot

Alas, it didn’t work.  I’ve yet to nail a Gentoo installation on the first attempt but this time I was much closer.  I ended up finding a wiki on installing Gentoo in a VM.  I rebuilt the kernel with some of the suggestions that were stated in the wiki and that did the trick.

I’ve been listening to earlier episodes of pauldotcom.com‘s weekly podcast and have continually heard Twitchy go on and on about how great Gentoo Linux is.  I finally got to episode 62 where Twitchy did a tech segment about portage which is the package management system for Gentoo Linux.  It SOUNDS fantastic.  Pretty similar to Macports but even better since EVERYTHING on your Gentoo system is a manageable package. When you upgrade packages on your system, new source code is downloaded and compiled locally(or can be distributed to other systems you run) and you can specify configuration options on the fly.  Portage keeps track of all installed packages and their dependencies(recursively).  If you want to install a package NOT already available in Gentoo, simply write an ebuild file and Portage will handle the rest of the process including keeping track of the package for you.  You are able to upgrade your entire system with a single emerge command every day, week, month, etc.  After hearing this, I felt it was finally time for me to try out Gentoo.

I consider myself a fairly seasoned Linux user.  I’ve been using Linux on and off for work and play since Yggdrasil Linux came out in 1993 or so and moved back and forth with Redhat and Debian over the years.  Gentoo SOUNDS like it may be the answer to many of my annoyances with the other systems mainly being the broken package management systems.  That being said, installing Gentoo Linux does not follow an obvious process.  Not to say it’s not easy but it’s doesn’t have a scripted install like Redhat or Debian and it’s most certainly not a GUI-based installer like Ubuntu..  When you put in the installation CD and boot it up, you end up at a live cd prompt.  What do you do from here?  You read the 7-page(tiny print) Gentoo Linux x86 Quick Install Guide of course…

My ancient Celeron 466MHz micro desktop system about to get Gentoo'd

Note: The following is a recap of MY personal adventure of installing Gentoo Linux.  It’s not meant as a replacement for their excellent documentation.  If you read the steps I followed though, you might find a couple of ways that I did stuff differently than stated in the installation guide.

Starting out at the top of the quick install guide, I see that the installation was timed on a MUCH quicker machine than mine.  When I type in:

grep bogo /proc/cpuinfo

I get a result back of 933.54.  The AMD 2000 1.6GHz system used for this guide is really old but not nearly as old as mine.  The result on the AMD was 3337.81 bogomips.  Hopefully my system ONLY takes 3x as long to install.  This little Celeron system is the same system that wouldn’t install Haiku for some reason.

Moving on down in the install guide, it looks like I already screwed up.  Apparently I should have used some switches at the first boot prompt when I started the system up.  When I booted, I should have type in:

boot: gentoo-nofb nodetect

That would disable X from trying to load and prevent a zillion kernel modules from loading but I think since my system is soooo old and all the drivers for my hardware are extremely mature by now, I didn’t hit any hang ups.  Doing a “ping go.com” at the command line netted me a favorable result so I’m just going to move on and call it good for now.

The first real and destructive step of this install is to partition your disk manually.  Disk druid?  I don’t think so.  It’s all about the fdisk.  On my system, /dev/hda is the hard drive.  I knew this because running a “df” command showed my CD-ROM as /dev/hdc.  So…

fdisk /dev/hda

The installation guide assumes that you know how to use fdisk.  Luckily I do.  I’m going to create three partitions for my installation as suggested.  One 128MB partition for boot where the kernel and lilo or grub will live, swap which I’ll make 256mb and a / (root) partition that uses up the remainder of the space on the drive.  I remembered to change the swap partition type to 82 and set the /boot partition bootable flag.  Now I need to commit the changes and format the paritions:

mke2fs /dev/hda1

mke2fs -j /dev/hda3 (-j for ext3)

mkswap /dev/hda2 && swapon /dev/hda2

Now mount the partitions in their proper locations:

mount /dev/hda1 /mnt/gentoo

mkdir /mnt/gentoo/boot

mount /dev/hda1 /mnt/gentoo/boot

cd /mnt/gentoo

After that, you are supposed to set the clock.  Since I’m on the net, I’ll run:

ntpdate pool.ntp.org

Now onto the less familiar stuff.  I need to wget the stage3 archive from a mirror.  I’m going to skip the step of finding a local mirror and simply use the default location:

wget ftp://distfiles.gentoo.org/pub/gentoo/releases/x86/current-stage3/stage3-i686-*.tar.bz2

This pulled a 130MB file down into the root directory of my freshly formatted hard disk.  Now to unpack it with:

tar -xjpf stag*

After that, I need to snag the latest portage build and unpack that so I can start managing packages:

cd /mnt/gentoo/usr

wget http://distfiles.gentoo.org/snapshots/portage-latest.tar.bz2

tar -xjf por*

Now to the weird stuff.  We need to chroot the filesystem.  Chroot fools bash into thinking that a sub directory is actually your root directory.  This allows you to type and run commands in a sandbox of sorts that shouldn’t be able to effect outside files.  In this case we have booted up a live CD and have sketched out enough of a root file system on our new disk to operate now so it’s time to switch into the new root file system in order to finish building it:

cd /

mount -t proc proc /mnt/gentoo/proc

mount -o bind /dev /mnt/gentoo/dev

cp -L /etc/resolv.conf /mnt/gentoo/etc/

chroot /mnt/gentoo /bin/bash

env-update && source /etc/profile

cp /usr/share/zoneinfo/America/Los_Angeles /etc/localtime

While I’m dealing with the timezone, I’ll “nano /etc/cron.d/clock” uncommenting the TIMEZONE line and changing “factory” to “America/Los_Angeles”  Then I’ll set up the hostname.  This is certainly not the most straight forward process:

cd /etc

echo “127.0.0.1 mybox.at.myplace mybox localhost” > hosts

sed -i -e ‘s/HOSTNAME.*/HOSTNAME=”mybox”/’ conf.d/hostname

hostname mybox && hostname -f

After all that, it’s time to build the kernel.  If you’ve never build a Linux kernel, you will probably find this step extremely overwhelming but hang in there.  You will learn the most about Linux in this single step.  Make use of the help that is embedded in the menuconfig script.  They used to be somewhat of a joke back in the days of the 2.0.X kernel but now most of the helps are actually very helpful.  Generally in the more confusing kernel options, it will say something like “if unsure, say Y(or N)”.  This will let you fake your way through the kernel config for the most part.  Don’t forget, you can always rebuild it later.

Note: The first time I ran through this, I forgot to include second extension filesystem.  This caused a non-bootable system since the /dev/hda1 block device is formatted ext2.  These errors are common and you’ll learn a lot from making them since something may not work correctly down the road.  Don’t get discouraged, just retrace your steps and you shouldn’t have a problem figuring out where you went wrong.  The command “dmesg” can be very helpful if you get booted.  If you DON’T get booted, whatever the kernel is hanging on should be printed on your screen.  On my Celeron 466MHz, a fairly stripped down kernel is taking me 100 minutes to build.  I’m sure yours is MUCH quicker so don’t be afraid to rebuild it a few times.

emerge gentoo-sources

cd /usr/src/linux

make menuconfig

make -j2

make modules_install

cp arch/i386/boot/bzImage /boot/

I would have thought that the next natural step in the installation process would be to install grub or lilo but oddly they have you jump to an entirely different topic which is fixing up the /etc/fstab to make it bootable.  So I need to run “nano /etc/fstab” and change BOOT to /dev/hda1, ROOT to /dev/hda3 and SWAP to /dev/hda2.  I’m skipping the network config for now and crossing my fingers that dhcp will do it’s job.

emerge dhcpcd

Also should install cron, syslog and grub:

emerge syslog-ng vixie-cron grub

rc-update add syslog-ng default

rc-update add vixie-cron default

Now I need to point grub to the kernel image that I built earlier.  Using nano I’ll want to edit /boot/grub/grub.conf.  Something like the following should work just fine for now as a grub.conf file:

default 0

timeout 10

title Gentoo

root (hd0, 0)

kernel /boot/bzImage root=/dev/hda3

After the file is saved, then I’ll run grub and walk through a few commands to write the bootloader to the MBR.  If I screw this up, I can just reboot from the live CD, chroot again and fix it up but let’s hope it just works right the first time:

grub

grub> root (hd0, 0)

grub> setup (hd0, 0)

grub> quit

Now for a final bit of housekeeping:

passwd

Time to see if all the hard work paid off.  I’m going to reboot and snag the CD out of the tray in the process:

exit

umount /mnt/gentoo/dev /mnt/gentoo/proc /mnt/gentoo/boot /mnt/gentoo

reboot

This next part is an account of MY troubleshooting process.  In most cases you will have your own set of problems that are different from mine.

DOH!  Kernel panic.  For some reason, my hard drive that was being detected as /dev/hda when I was installing is now being detected as /dev/sda so the boot loader passes the wrong root parameter to the kernel.  I suspect this is a problem with the way I built the kernel.  For now, I want to get the box running.  Time to go back to the live cd, boot and chroot.  First off, I’m going to install lilo since I’m a bit oldschool and I’m more familiar with it.

emerge lilo

mv /etc/lilo.conf.example /etc/lilo.conf

I edited the lilo.conf to point it at /dev/hda for the spot to write the bootloader but then pointed the root partition to /dev/sda3.  When I tried running lilo, it crapped out with a fatal error since /dev/sda didn’t exist when booted on the live cd.  I can do a quick, ugly thing to fix that:

ln -s /dev/hda /dev/sda

lilo

This successfully wrote the Gentoo option to the MBR.  When I tried to boot however, I still got a kernel panic so I rebooted again and typed the following at the lilo prompt:

gentoo root=”/dev/sda3″ boot=”/dev/sda1″

That seemed to work and the system finally booted!  Not ideal but now I’m to a point where I can troubleshoot without the hassle of using the live CD and chrooting.  Next I edited the lilo.conf to show /dev/sda as the boot device and reran “lilo” at the prompt.  When all of this was done it was time for a reboot and this time everything came up perfectly.

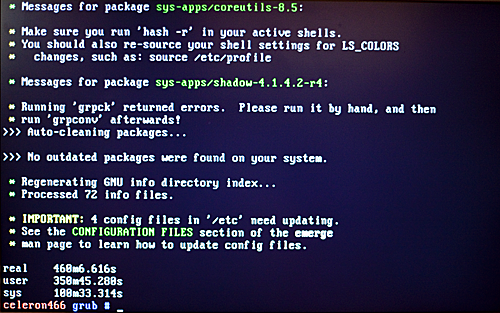
My first task with this newly working system was to bring it up to an entirely current, updated state.

emerge –sync

time emerge -u world

The picture speaks to the fact that this is an old, slow computer but the operation was successful in the end.

Final words

How many other modern, current and fully patched operating systems would legitimately be able to run on this computer?  Not many.  I’m not sure why Haiku wouldn’t run but it may have just been circumstantial.  Installing Gentoo was a bit of an adventure but using Gentoo makes Debian seem both bloated and outdated.

If you have been a casual Linux user and you want to learn WAY more about Linux, installing Gentoo is an excellent way to achieve that goal.  If you are a developer/hacker who always needs the latest and greatest packages at their disposal and doesn’t want to deal with dependency hell, you probably already use Gentoo.

I am currently searching for a 486/66 to add to my small cluster of old hardware.  After I find one, I will probably attempt to install Gentoo on that hardware and I expect to be successful with that endeavor.

Powered by WordPress. Theme: Motion by 85ideas.