Tag Archive: zipit


Zipit exposed (er x-rayed)

Click to enlarge

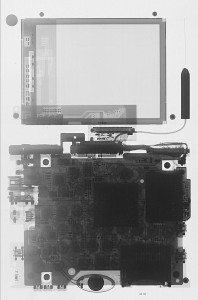
If you are too chicken to follow my Zipit disassembly instructions but still want to see what it looks like inside the Zipit Z2, here’s your chance.  The metal shield inside the battery compartment makes the motherboard area a bit darker than it would normally be but you can still make it out.

Take a look at how fine the wires in that LCD cable are…  Now you realize why you have to be so careful with it when you open up your Zipit.  The antenna also looks super thin in the x-ray but it’s not really that fine when you see it.

The speaker looks like an all-seeing evil eyeball to me.

At first, U-boot may seem like just a way to load a root file system on your Zipit Z2 but it is capable of so much more.  If you type “help” at your U-boot prompt, you will get a HUGE list of commands.  Some are self explanatory but others are coupled with vague descriptions.  To delve deeper into some of these commands, I did a bit of poking around online.  Before you proceed, please realize that attempting to fuzz memory locations like this could potential result in a brick or hardware damage. That being said, here is a short list of commands I’ve put together that I’ve found useful for exploring the Zipit at the bit level:

MD (Memory Display) – You can use this command with a couple of suffixes.  For example md.b, md.w & md.l all change the way that the output is displayed.  Experiment with those and see which one works best for your purpose.

md 0x40E00000

By default, md will show you several lines of memory starting at the address you type in.  To see the exact contents 4 bytes of memory, you would type in something like:

md 0x40E00000 1

The “1” is an offset value that tells the command to display one 4-byte block.  You can change that to see however many locations you would like.  After you use a value here, it will persist until you use a different value.  In other words, next time you type “md 0x40E00000”  without the “1”, it will show you 4-bytes until you run the command again with a different offset.

MTEST (Memory Test) – Memory test will perform test passes on a specified range of memory using a specified pattern.  For instance, if you want to see some interesting bits get flipped, type in:

mtest 40E0000C 40E0000D FFFFFFFF

This will fuzz the range of memory from 40E0000C-40E0000D with the specified test pattern.  I believe the LCD or power saving features may live in this range because this command makes the screen flicker.  I’m not entirely sure how the pattern value (“FFFFFFFF”) works but a bit of experimentation and you should be able to figure it out.

NM (Memory Modify) – This command allows you to selectively flip bits of any byte in memory.  For instance, if you run:

nm 40E0000C

You will see something similar to:

40E0000C: 0000032a ?

That is a prompt that is showing you the existing contents of the 4-bytes.  If you type in “FFFFFFFF”, that will set ALL of the 32-bits(4-bytes) to the “on” position.  In this case, it makes the screen dimmer.  The line will increment and ask you again what you would like to change to.  This time, if you type “00000000”, it will turn ALL 32-bits off and the screen will go to full brightness.  If it’s not already obvious, ALL of those bits and bytes don’t control the screen brightness.  You can start to narrow it down by flipping the nibbles(half-bytes).  Starting with “F0000000”, “0F000000”, “00F00000” and so on will narrow down which byte the brightness lives in.

It appears to be in the “00000F00” nibble.  So now it’s time to start flipping the bits.  The individual bits are at 1, 2, 4 & 8.  So something like “00000100”, “00000200”, “00000400” etc will track down the specific bit.  Turns out that it’s the most significant bit of that specific nibble.  So in binary, it looks like “1000”.  That translates to 8 in hex.  To sum it up, changing between “00000800” and “00000000” with toggle the LCD backlight between bright and dim.

If any of this is confusing, you should read my post on binary to hex number conversion.  Many people seem to think that computers somehow don’t operate on binary logic anymore but an exercise such as this proves quite the opposite to be true.

On the Zipit Z2, you probably don’t NEED to probe around like this since you can download a manual for the CPU and find most of the memory locations in there but if you just want to experiment or if you have another similar undocumented device that you want to reverse engineer, then this is a good way to go.

So you have U-Booted your Zipit Z2?  Great!  Now you are ready to exploit one of the biggest advantages of moving from blob to U-boot…  Building your own kernel.

First off, you need to have built a cross-compiler of some sort to build the kernel.  I have posted directions for my version here in my post about building U-Boot for the Z2.  After that, you will need to make sure u-boot-tools is installed on your system.  On Gentoo you can use portage to install it but you will need to unmask the package.  To unmask that package on Gentoo, add ACCEPT_KEYWORDS=”~x86″ to your /etc/make.conf.  Then type “emerge u-boot-tools”.

Next, download the latest version of the Zipit kernel from here:

http://git.kernel.org/?p=linux/kernel/git/marex/pxa-linux-2.6.git;a=shortlog;h=refs/heads/zipitz2

To start off, I’m going to use Mozzwald’s suggested .config file.  You will need to rename it .config and put it in the base directory of your kernel.  Next, replace the <base_kernel_dir>/arch/arm/mach-pxa/z2.c with a bleeding edge one if desired.  Mozzwald and Sweetlilmre both have been diligently hacking away at that file so you could ask in the irc.freenode.net #zipit-dev channel to obtain the latest version or use this z2.c for now.

Now for the fun stuff.  You can use a make menuconfig command as follows to add your own customizations to the kernel:

make ARCH=arm CROSS_COMPILE=arm-linux-gnueabi- menuconfig

Now it’s time to build the new kernel:

make ARCH=arm CROSS_COMPILE=arm-linux-gnueabi- -j9 uImage

Now, if you built a modular kernel, you will need to build the modules and stick them somewhere:

make ARCH=arm CROSS_COMPILE=arm-linux-gnueabi- modules
make ARCH=arm CROSS_COMPILE=arm-linux-gnueabi- INSTALL_MOD_PATH=/where/to/drop/modules modules_install

After this is done, your new kernel should be sitting there for you ready to go in the arch/arm/boot directory and your modules are wherever you put them.  Just copy the uImage and modules to the appropriate locations on your Zipit’s SD card and you will be good to go.

The latest version of U-Boot(as of 8/19/2010) adds the ability to use the screen and keypad on your Zipit Z2 to display a console(albiet sideways).  U-boot also allows a splash screen on the LCD during boot up if a sideways console is not useful to you.  Personal I like the console on my serial port anyways so a nifty splash screen would be a nice touch.  Since I have a serial mod, I will provide instructions to add the splash screen via ymodem.  First thing is first, you will need a bitmap file that is 320×240 and rotated 90 degrees counter-clock-wise.  It also has to be 8 bit color depth.  In order to save a BMP as an 8-bit file in Photoshop, you will need to change the mode to “indexed color”.

From your serial console, type in the following command:

loady 0x5c000000

Next, you will need to write that file to memory.  Use the flinfo command to make sure your memory matches mine.  The last two sectors are where we will store your file.  Make sure your file won’t take up more than two sectors(it shouldn’t).  The bmp file I’m using is only 79k or so which uses only one and a third of a sector or so.  After you’ve checked your memory, use the following command to move your bitmap to a permanent location:

protect off all; erase 0x7e0000 +20000; cp.b 0x5c000000 0x7e0000 0x13034

The last number 0x13034 is your file size in hex.  If you look up the screen a bit, your loady command should have outputted a file size in hex and decimal.  Use YOUR file size instead of mine unless you are using my file of course.  Now you can test your image:

bmp display 0x7e0000

Cool, eh?  Now it’s time to make it load automagically on bootup:

setenv splashimage 0x7e0000

saveenv

Now when you reset, you should see your splash screen.

Since there is no central repository for fresh U-Boot binaries for the Zipit Z2, I decided to build my own u-boot.bin from source.  Before I could do this, I needed to build a cross compiler for the arm processor.  This is something I’ve always had trouble with on Debian systems but this time I used Gentoo and everything worked flawlessly.  Luckily Marex left me with some very helpful hints on how to get the job done.  First, you’ll need to set up a cross compiler if you have not already:

emerge crossdev

You’ll need to add the following lines to your /etc/make.conf:

PORTDIR_OVERLAY=”/usr/local/portage $PORTDIR_OVERLAY”

Don’t forget to make the following directory since that is where your new tool chain is going to live:

mkdir /usr/local/portage

Now it’s time to build your tool chain.  This will take quite a bit of time.

time crossdev -S -t arm-linux-gnueabi

After all of that, you should be ready to build your u-boot.bin.  First you need to grab the latest snapshot from http://git.denx.de/?p=u-boot/u-boot-pxa.git;a=shortlog;h=refs/heads/devel.  Go ahead and unpack the file in your home directory:

tar -xvf u-boot-pxa-*

cd u-boot-pxa

Next you need to run the following command.  Double check and make certain that you have a space between the “…gnueabi-” and the “zipitz2…” parts.

make CROSS_COMPILE=arm-linux-gnueabi- zipitz2_config

Lastly, you can build the u-boot.bin firmware file with this command:

make CROSS_COMPILE=arm-linux-gnueabi-

You should now have a working u-boot.bin file in the ./u-boot-pxa directory.  With that file, you can follow these instructions to upgrade U-boot on your Zipit Z2.  As usual, thanks to Marex for giving me the proper hints to make this happen.

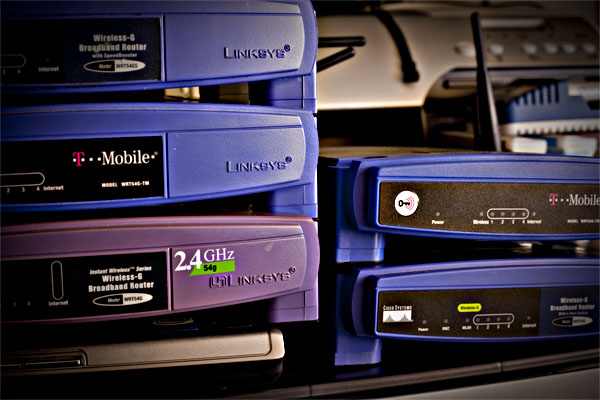
I’ve been messing around with my stack of WRT54G routers this weekend.  So far I have serial modded two out of the five that I have sitting here.  The neat thing about the serial mod is that it’s so easy to grab a console off of it without worrying about network parameters.  The bad thing is that your router may or may not be connected to the internet when you are on that console.  It’s pretty easy to hook up to another wireless router in client mode from the console.  I couldn’t find the following information all in one place so I’m going to hash out the quick version here:

iwconfig wlan0 essid router_name

iwconfig wlan0 key 0123456789 (I have a wep router handy for connecting older devices)

ifconfig wlan0 10.10.10.40 netmask 255.255.255.0 (no dhcp client on my router by default)

ifconfig wlan0 up

route add default gw 10.10.10.1

ifconfig wlan0 up

and finally add a known dns server (like 8.8.8.8) to your /etc/resolv.conf with vi

For advanced Unix users, none of this is anything new but hopefully this will help someone else out there who is struggling through an OpenWrt or Gentoo install or can’t figure out how to configure wireless on your Zipit after you’ve put an aftermarket root fs on it.  All of these settings will disappear when you reboot your device aside from editing the resolv.conf although if you are using a WRT54G series router, your edits to the resolv.conf will also disappear.

Building OpenEmbedded for the Zipit z2

OpenEmbedded was the original starting point for unlocking Linux on the Zipit Z2.  Nowadays there are plenty of userlands floating around out there but if you want to take things even further on your Zipit, you’ll probably need to build OE.

OpenEmbedded will allow you to compile packages and actually build your own custom rootfs from the ground up. You’ll be able to use your fastest desktop system to cross compile packages for your zipit and even build a custom kernel for your zipit as long as you are using U-boot.

To get started I’m simply going to expand on Sweetlilmre’s directions.

  1. Make sure you have like 80 gigs free on your hard drive.  I would suggest using Debian or Ubuntu as your base OS for these directions.
  2. At command prompt, go to your home directory and type “svn co https://openzipit.svn.sourceforge.net/svnroot/openzipit/oe”
  3. CD to the OE directory
  4. type in “make” and wait…

At this point, you may be getting a list of dependencies that are broken so you might need to fire up apt-get and get some packages.  After you are able to successfully “make”, then you should be ready to get started.  (That’s right, that was just the beginning)

  1. Run “./oe_zipitz2.sh”  This script sets up the environment to start building.  It should change your bash prompt to a green one.  That alerts you that you can start bitbaking.
  2. Now you need to build the base-image so run “bitbake base-image” and wait…

Many hours later, your base-image should be built and ready to go.  Just make sure you have no errors waiting for you on the screen.  If everything went well, you should have a rootfs and kernel waiting for you in “~oe/zipitz2-tmp/deploy/glibc/images/zipitz2”.  There should be file called base-image-zipitz2.tar.  You will need to untar that file to a blank sd card formatted ext3.  Use the “-pxvf” switch with tar so that the permissions are preserved.

After that is done, you should be ready to boot your new minimalist userland.  If you are using U-boot, you will need one additional step.  Copy this uboot.script file to the /boot directory on your SD card and make sure your U-boot environment variables are set up similar to how I have outlined it in this post.

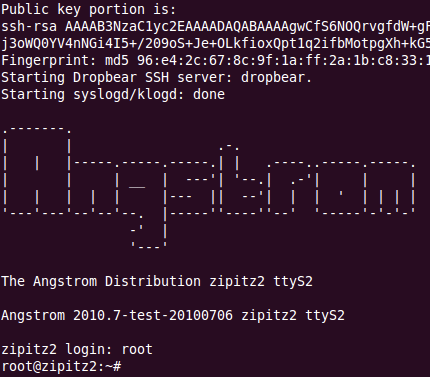
Apparently this distribution has both serial console and local support built in out of the box.  When you boot up over the serial port, you will be presented with a screen that looks like this:

There is no root password.  Just type in root and hit enter.  You’ll be logged right in.  Now that you’ve gotten this far, you should be ready to follow Hunter’s directions to build dosbox or maybe something even more exciting.  Post in the comments and let me know.

If you are interested in buying your own Zipit to hack and you like the information on my site, please buy your Zipit using this link and support my site. You won’t find them anywhere cheaper than that anyways.

Side-track running on a U-booted Zipit

Irongeek’s side-track Linux was built around a semi-stock Zipit Z2.  In order to run side-track, you have to re flash the Zipit with a hacked 2.6.29 kernel but you keep the original blob bootloader.  The problem with keeping blob is that it doesn’t allow you to use any other kernels and things have come a LONG way since 2.6.29.  U-boot is the future of the Zipit as a hacking platform but right now it’s still a short bit away from being a seamless process.  One of the problems is that some userlands such as side-track will no longer act as expected.  There are a few things that will be tweaked in order for it to run at all.

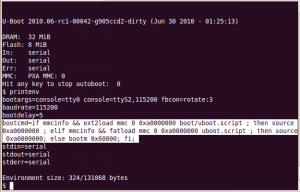
For starters, you’ll want a uImage and uboot.script that will be good enough to boot with.  You will put these files in your /boot directory on your sidetrack sd card.  As stated in one of my other posts about U-boot, you will need to make sure this line is set as an environment variable in U-boot:

bootcmd=if mmcinfo && ext2load mmc 0 0xa0000000 boot/uboot.script ; then source 0xa0000000 ; elif mmcinfo && fatload mmc 0 0xa0000000 uboot.script ; then source 0xa0000000; else bootm 0×60000; fi;

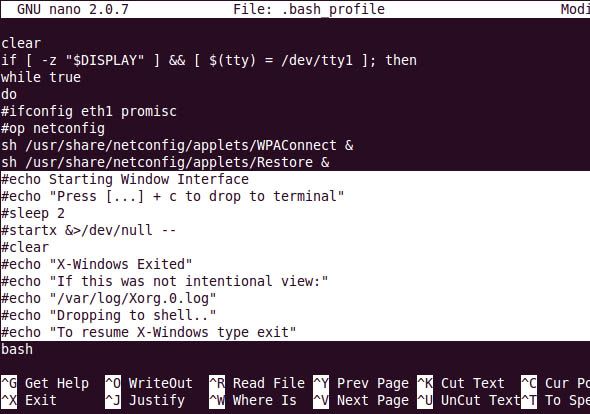
These things will probably make your system bootable at least.  When you boot however, you will not be able to do anything because the keymouse driver is broken under the new kernel.  Mozzwald and some others are looking for some solutions to this problem but for now, we should just disable X so we can try out the system a bit and see what else is broken.  To disable X in side-track, edit /root/.bash_profile.  Comment out the following line:

startx &>/dev/null —

If you want to clean up all the garbage messages on the console, also comment out the 3 line before startx and 6 lines after it since none of them are needed now either.

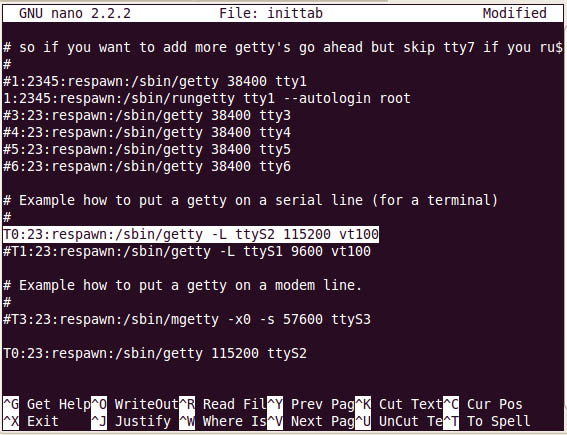
If you have a serial port, you will also want to enable the console access so you can log in from your desktop and type away.  To do so, you will need to fix this line in /etc/inittab to look like my screenshot below:

This gets you in a minimally running state where you aren’t locked out of the console anymore.  Then you can move onto other tasks such as making the font readable since the kernel sets the font size down to extreme eyes training levels.  I’ll leave that discussion for a different day.
If you are interested in buying your own Zipit to hack and you like the information on my site, please buy your Zipit using this link and support my site. You won’t find them anywhere cheaper than that anyways.

When U-boot was presented to me, the default behavior is to attempt to read your SD card and look for uboot.script on the first partition of the card which is expected to be vfat.  I found this to be a pain because so far all the user lands that I have don’t have a vfat partition as a primary.  Usually the first partition is your main user land partition and it’s generally ext3.  I wanted to tweak U-boot to be able to boot from a kernel and uboot.script that is placed in the /boot directory in whatever userland I’m using.  Marex suggested that it would be easy enough to use logic to accommodate both setups.  With a bit of his assistance, I was able to come up with a new environment variable that worked. The old bootcmd variable looked like this:

bootcmd=if mmcinfo && fatload mmc 0 0xa0000000 uboot.script ; then source 0xa0000000; else bootm 0x60000; fi;

If you break this down, you’ll see it looks for the uboot.script on the root directory of the first fat partition on mmc 0.  If it finds the uboot.script there, it loads it and executes the commands contained within it.  If not, it continues and boots whatever is sitting at the 0x60000 location in flash memory and uses the environment variables currently loaded in u-boot itself.  If there is nothing there, it fails.  My new bootcmd variable looks like this:

bootcmd=if mmcinfo && ext2load mmc 0 0xa0000000 boot/uboot.script ; then source 0xa0000000 ; elif mmcinfo && fatload mmc 0 0xa0000000 uboot.script ; then source 0xa0000000; else bootm 0x60000; fi;

This one will first look for the uboot.script file under the /boot directory on the first ext2/3 partition for the uboot.image on the first ext2/3 partition.  If it is not there or the partition is not ext2/3, it tries to look for the file on the first vfat partition.  If it can’t find that it will try to load a kernel that is in your flash memory if it exists.

Of course the old uboot.script does not work with the ext2/3 configuration described above.  I went ahead and tweaked the uboot.script.base file as follows:

if ext2load mmc 0 0xa0000000 boot/uImage; then
setenv bootargs console=tty0 console=ttyS2,115200 fbcon=rotate:3 root=/dev/mmcblk0p1 rootdelay=3
bootm 0xa0000000;
fi

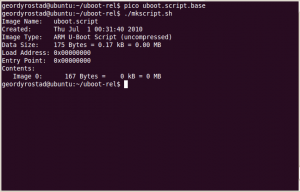
I saved it and then ran ./mkscript.sh to make the uboot.script which is actually a binary file and then copied the uboot.script that was created to /boot on the proper SDcard.

To build a new uboot.script file, you need to:

apt-get install uboot-mkimage

the uboot.script.base and mkscript.sh can be found in this file: z2-uboot-06262010.tar.gz

Note: this file is outdated but does contain the script to rebuild uboot.script.

Earlier today, Mozzwald helped me flash a default static-linked kernel into the flash ram.  This allowed me to boot side-track under U-boot for the first time since upgrading to U-boot without ANY changes to side-track.  Unfortunately, the mouse driver is broken under this later linux kernel and will probably need to be recompiled.

I could go through the process of flashing that static kernel into memory but I don’t feel comfortable doing so because it’s not very streamlined at this point.  If you are interested in the instructions, just speak up on the #zipit channel on freenode and someone will probably be able to help you through it.

using ymodem to transfer the new firmware

Warning: This can brick your Zipit Z2 if you don’t follow the instructions precisely.  Even if you do follow the instructions precisely, you might brick your Zipit.  This proceedure only works if you already flashed U-boot onto your Zipit

Read all of the instructions completely before attempting this procedure.

With that out of the way, I’m going to upgrade to a newer version of U-boot that Marex provided me by following his instructions. This newer version will boot from an SDHC card.

First, you need a serial mod to use this method.  This is the safest method of upgrading U-boot since you are actually testing the firmware before you flash it.  There is also a method to update U-boot from Linux that I will post later.  Download the newer version of U-boot from:

http://marex.hackndev.com/zipitz2/U-Boot.rel.Jun.30-2010.bin.

The md5sum is e82ce84f11c1fa50106f5c005bf912f7.  Do yourself a favor and actually check the md5 hash.  It’s very important that this file didn’t get corrupted in transit.

Here are the instructions:

1) enter serial prompt on the Z2 in U-boot (best is to use minicom — for ymodem)

2) Type the following command and then send the new U-boot bin file via YMODEM

loady 0x5c000000

3) Run the new firmware with the following command and the Zipit will reboot.  Hit a key to cancel auto boot.

THIS IS THE LAST STEP THAT IS NOT DANGEROUS.

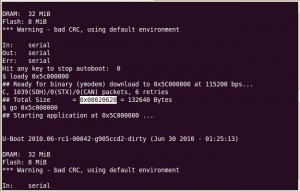
go 0x5c000000

4) after you run “go 0x5c000000”, the new bootloader is now started and you need to cancel auto-boot … you’ll get a new prompt (of the new bootloader) … DO NOT TYPE ANYTHING BUT THE FOLLOWING COMMANDS.  If you power cycle the unit before typing the following commands or do any other actions, you will likely brick the unit.

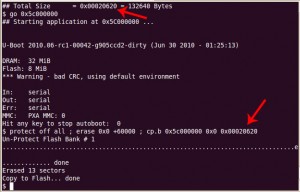
protect off all ; erase 0x0 +60000 ; cp.b 0x5c000000 0x0 0x00020620

5) Type “reset” and pray

Make sure the two numbers match BEFORE pressing enter

Caveats: DO NOT TYPE ANYTHING between step 3 and 4 if you want to reflash. If you just want to test the new firmware out without reflashing, stop at step 3. You can type boot at the prompt and that should show the new functionality and if it works. When you power cycle, the firmware will revert if you don’t complete step 4.  Do NOT run step 4 unless that last number matches as indicated in the picture by the two red arrows.

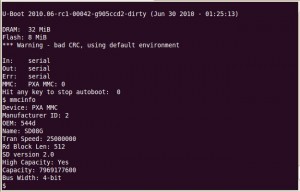
U-boot seems to recognize my 8gb SD card

Here are a couple of U-boot commands to play with:

If you want to get rid of the “*** Warning – bad CRC, using default environment” message upon bootup, just type “saveenv” at the prompt.

printenv will show you the current environment variables for U-boot

mmcinfo will print information about whatever card is in the SD slot

help should be obvious

reset should be obvious

boot should also be obvious

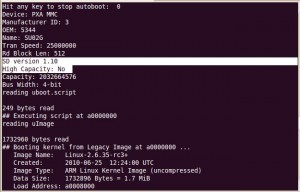
U-boot booting up my existing 2gb card

Thanks again to Marex for providing me the instructions, firmware and answering my questions.  Follow this link for further information on this version of U-boot.  Follow this link for more general information on U-boot on a Zipit.

If you are interested in buying your own Zipit to hack and you like the information on my site, please buy your Zipit using this link and support my site. You won’t find them anywhere cheaper than that anyways.

Powered by WordPress. Theme: Motion by 85ideas.